Reclaim is better when you sign in
Become a Reclaim Member to save all your home and style inspiration.
or login here
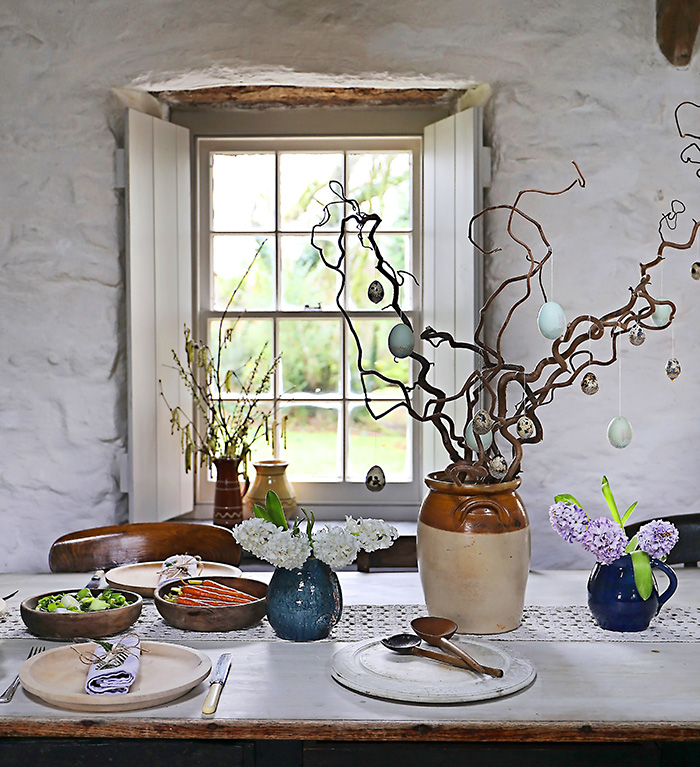
Make pretty Easter decorations to welcome spring
Author: Alice Roberton
© Janice Issitt, styling Tamsyn Morgans & Alice Roberton
Create your own simple table and wall decorations, inspired by the beauty of the natural world
When the first of the spring sunlight streams indoors and gives that reassuring feeling that winter is on its way out, it makes us want to throw open the windows and enjoy all things blossoming and pretty. It gives a sense of hope, both in the home and the soul.
Embrace this feeling and connect with nature by making your own decorations as a centrepiece to grace a celebratory table, to prop on a window sill for a splash of joyful colour, or to hang on your front door to greet visitors.
© Janice Issitt, styling Tamsyn Morgans & Alice Roberton
Hand-blown Easter eggs
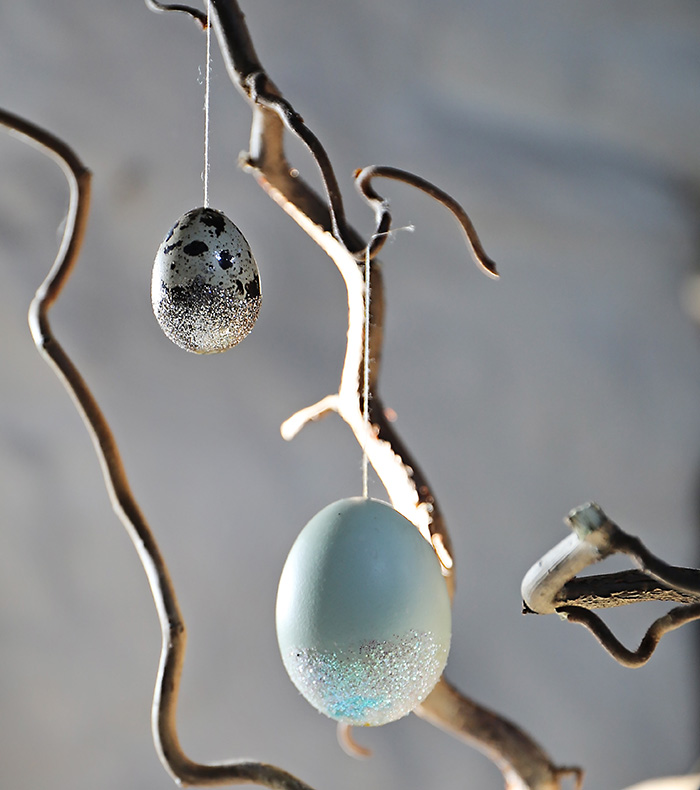
The art of egg-blowing has been popular in Eastern Europe for centuries. Decorated in a variety of ways, these beautiful eggs are in abundance around Easter time. Traditionally, eggs were carved, dyed, painted, appliqued or embellished, but the natural colour of Old Cotswold Legbar and quail eggs create an unfussy look.
The ends have been dipped in silver and gold glitter to add a little sparkle, and then hung from twisted-willow branches to make a striking centrepiece.
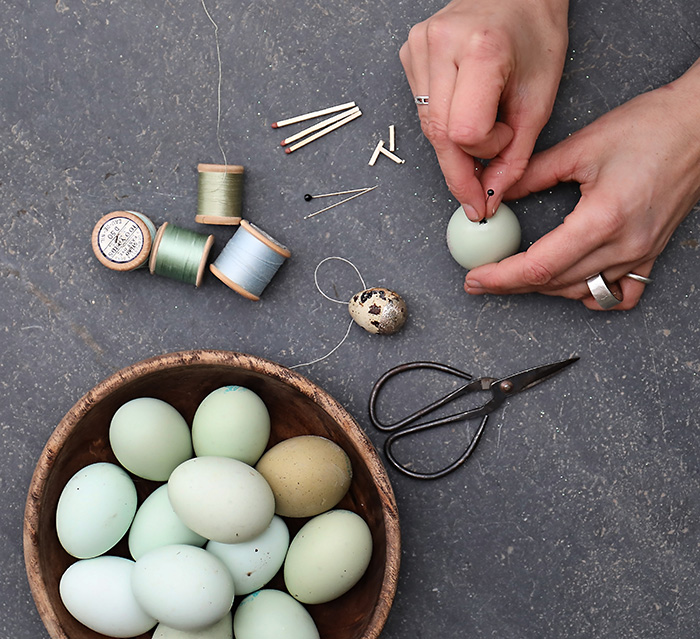
You will need
- A deep bowl
- Medium to large needle (or large pin)
- Eggs, such as goose, duck, Burford Browns, Old Cotswold Legbar and quail eggs
- Scissors
- Box of cook’s matches or cocktail sticks
- Cotton thread
- PVA glue
- Fine paintbrush
- Silver and gold glitter
© Janice Issitt, styling Tamsyn Morgans & Alice Roberton
To make
- Sit at a table and place the bowl in front of you. Take a needle and gently stab the top point of one of the eggs until you get your first hole, and repeat a couple of times. Then gently work the hole until it is about the size of a pin-head. Turn the egg over and repeat on the opposite end.
- Once you have a solid hole at both ends, poke the needle inside the egg to pierce the yolk, then gently hold the top end of the shell to your mouth and blow the egg into the bowl. (This may take some force to get going as the membrane may need to break.)
© Janice Issitt, styling Tamsyn Morgans & Alice Roberton
- Once all of the egg is out, clean up the shell. Take the scissors and cut a piece of a matchstick or cocktail stick to about 1cm. Wrap and securely tie a length of thread around the middle of it, much like making a rope swing.
- Poke the wooden stick, end first, through the hole and allow it to secure itself behind the hole. Now you should have an egg hanging by a thread.
- To add glitter to the egg, take a fine brush and paint PVA glue on to the base of the shell, then sprinkle on the glitter. Save the eggs for cooking.
© Janice Issitt, styling Tamsyn Morgans & Alice Roberton
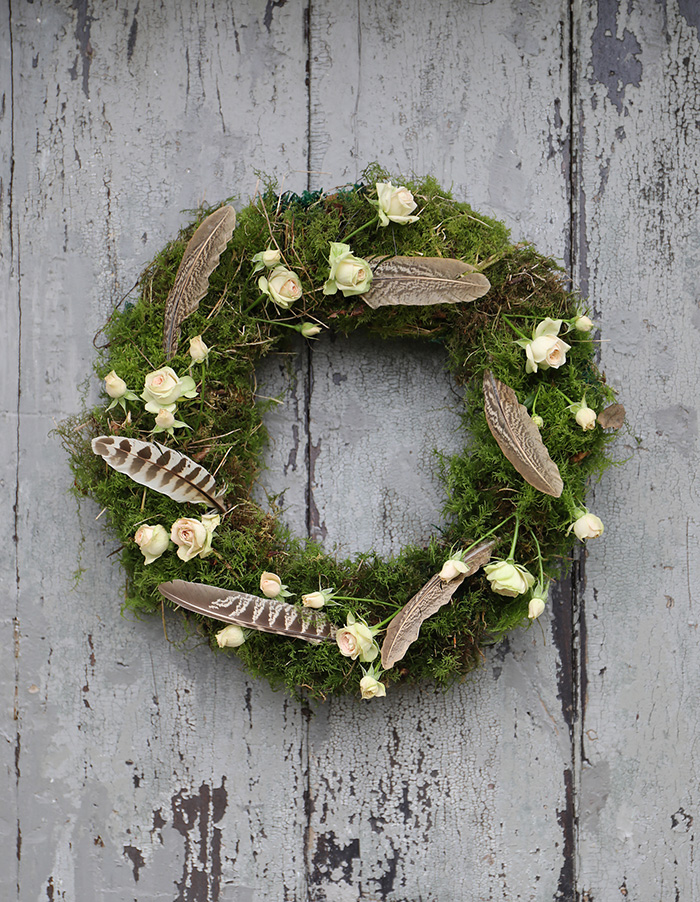
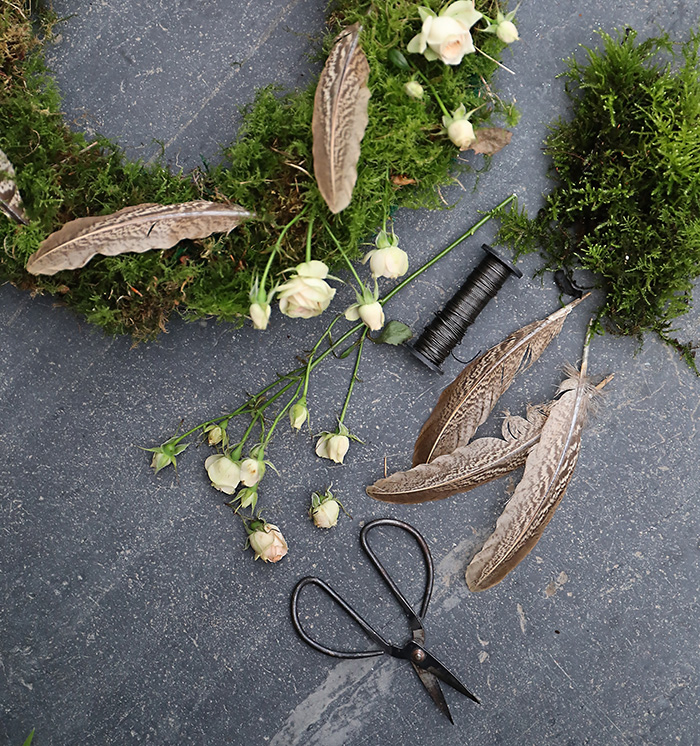
Moss and feather wreath
Apart from the rosebuds, natural materials for this easy wreath could be gathered on a walk in the countryside. Moss can be found in moisture-rich, wooded areas (be careful not to trespass or disturb animal habitats), while a keen eye can spot pheasant feathers out in the wild. You could also use ferns, leaves, twigs or any natural material that reflects your style.
You will need
- Cream-coloured rosebuds
- Scissors or wire cutters
- Florist’s wire
- Moss
- Wreath base
- Pheasant feathers
© Janice Issitt, styling Tamsyn Morgans & Alice Roberton
To make
- Snip the rosebud stems to the desired length and allow them to rest in water for a couple of hours.
- Using the wire, lash the damp moss to the wreath base until you have the desired effect. You can go for plush and full, or less is more.
- To decorate the base, poke the rosebud stems in under the wire, then repeat with the feathers.
© Janice Issitt, styling Tamsyn Morgans & Alice Roberton
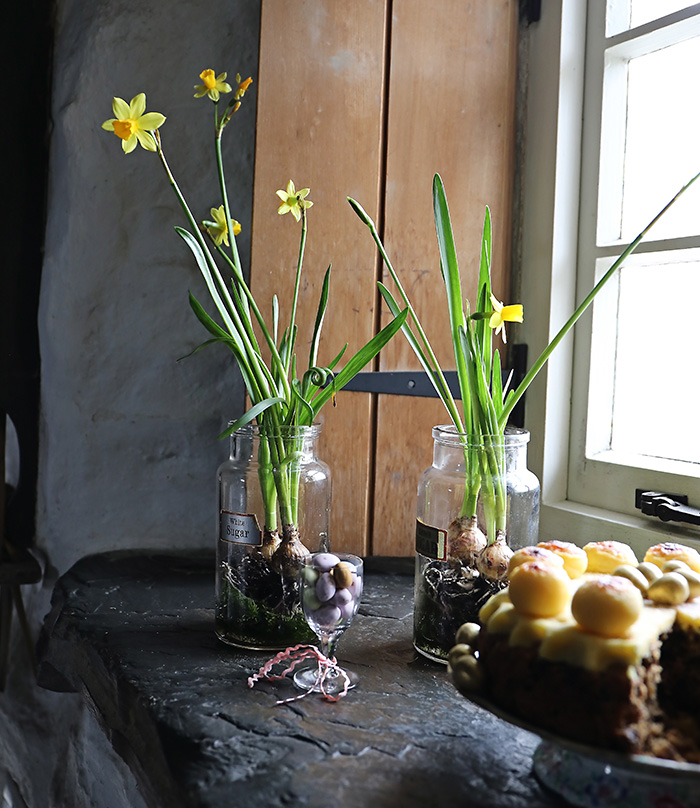
Daffodil terrarium
As an alternative to the conventional vase, this terrarium has been created using old sugar storage jars, filled with damp moss and flowering daffodils. To get the look, hunt on Etsy or eBay where you can find reasonably priced vintage Kilner and Mason preserving jars or retro storage jars.
You will need
- Large vintage glass jar
- Moss
- Flowering daffodil bulb
To make
- Place the moss in the jar and soak well with water. Add the earth-free bulb, making sure all the roots are in the water.
Before you go...
...fancy automatic entry to all future competitions?
Simply register online today for FREE and you will get:
Automatic entry to all current and future competitions.
Access to Reclaim Inspiration - an online visual pinboard for saving all your home and style inspiration.
A regular newsletter of inspiration, ideas and advice.

Save all your articles in one place
Become a Reclaim Member to save all your home and style inspiration. Simply login or register online today for FREE and you will get:
Automatic entry to all current and future competitions.
Access to Reclaim Inspiration - an online visual pinboard for saving all your home and style inspiration.
A regular newsletter of inspiration, ideas and advice.